This Herb-Crusted Standing Rib Roast is the centerpiece your holiday table deserves. It takes about 3 hours of mostly hands-off roasting (plus an overnight dry-brine for the deepest flavor), serves 8 to 10 people comfortably, and delivers results that look and taste far more impressive than the effort required.

- 1 (4-bone) standing rib roast, about 8–9 lbs (USDA Choice or Prime)
- 3 tablespoons kosher salt (Diamond Crystal; use 2 tablespoons if using Morton’s)
- 2 tablespoons fresh rosemary, finely chopped
- 2 tablespoons fresh thyme leaves
- 1 tablespoon coarsely cracked black pepper
- 6 cloves garlic, minced to a paste
- 3 tablespoons extra-virgin olive oil
- 1 tablespoon Dijon mustard
- 2 shallots, finely minced
- 1 cup dry red wine (such as Cabernet Sauvignon or Côtes du Rhône)
- 2 cups good-quality low-sodium beef stock
- 1 tablespoon unsalted butter
- 1 fresh thyme sprig (for pan sauce)
- DAY BEFORE — Make the herb paste: In a small bowl, combine the kosher salt, rosemary, thyme, cracked black pepper, garlic paste, olive oil, and Dijon mustard. Stir until it forms a thick, fragrant paste.
- Pat the roast thoroughly dry with paper towels — surface moisture is the enemy of a proper crust. Set the roast bone-side down on a wire rack set inside a rimmed baking sheet.
- Rub the herb paste firmly all over the top and sides of the roast, pressing so it fully adheres. Leave the underside (where the bones rest) uncoated.
- Refrigerate the roast uncovered on the rack and baking sheet for at least 12 hours and up to 36 hours. The uncovered refrigerator air dehydrates the surface, ensuring a crisp crust rather than a steamed one.
- DAY OF — Remove the roast from the refrigerator 2 hours before roasting to take the chill off and promote even cooking.
- Preheat the oven to 500°F (or as high as your oven will go), with a rack positioned in the lower third.
- Slide the roast on its rack and baking sheet into the oven bone-side down. Roast at 500°F for exactly 20 minutes to set the crust and initiate the Maillard browning reaction.
- Without opening the oven door, reduce the oven temperature to 250°F. Continue roasting for approximately 2½ to 3½ hours, until a probe thermometer inserted into the thickest part of the eye of meat (away from bone and fat) reads 120°F for rare, 125°F for medium-rare (recommended), or 130°F for medium. The temperature will rise another 5–8°F during resting, so pull early.
- Transfer the roast to a cutting board with a juice well and tent loosely with foil. Rest for a minimum of 30 minutes, ideally 45 minutes, to allow juices to redistribute evenly throughout the meat.
- MAKE THE PAN SAUCE — Place the baking sheet over two burners on medium heat (or pour drippings into a skillet). Add the minced shallots and cook, stirring, for about 2 minutes until softened.
- Pour in the red wine and let it bubble vigorously, scraping up all browned bits from the bottom of the pan. Reduce by half, about 3–4 minutes.
- Add the beef stock and thyme sprig. Simmer until reduced by about one-third and the sauce has a lightly syrupy consistency, 6–8 minutes.
- Remove from heat and swirl in the butter until melted and glossy. Season with salt and pepper to taste. Strain into a warmed serving vessel if you prefer a smooth sauce.
- CARVE AND SERVE — Snip any kitchen twine if the butcher tied the bones back on, and set the bones aside. Slice the roast between the ribs or carve boneless slices to desired thickness. Serve immediately with the pan sauce alongside.
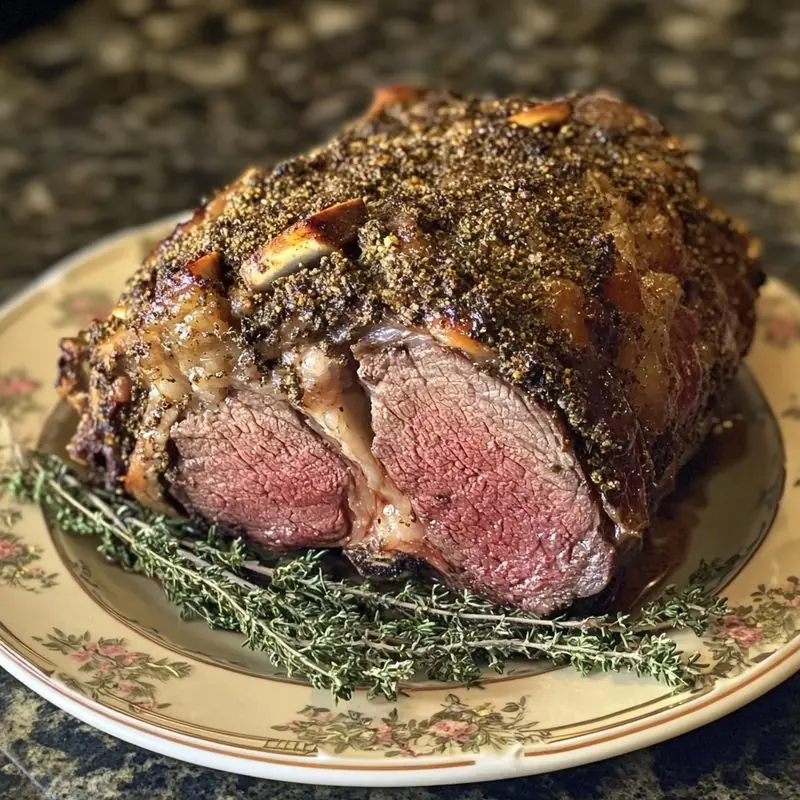
Picture a roast with a deeply burnished, herb-flecked crust — rosemary, thyme, and cracked black pepper forming an almost bark-like shell that shatters slightly when you slice into it. Beneath that crust, the meat is a vivid, even rose from edge to edge, juicy and richly beefy, with just enough fat marbling to keep every bite silky. The drippings left in the pan smell like the best steakhouse you’ve ever walked into. This is the kind of roast people talk about for years.
What makes this version work is a two-part temperature approach: a high initial blast of heat sets the crust in the first 20 minutes, then the oven drops to a low, steady 250°F to slowly bring the interior to the perfect temperature without overshooting. That low-and-slow finish is the reason you get edge-to-edge pink instead of a grey ring around a rare center — the classic frustration with prime rib at home. The overnight dry-brine does double duty, seasoning the meat deep into the muscle and drawing out surface moisture so that crust can actually crisp rather than steam.
Why You’ll Love This Recipe
- Foolproof even pink center: The reverse-sear-style two-temperature method eliminates the guesswork that causes uneven cooking.
- Minimal active work: Most of the time is hands-off oven time. The prep itself takes under 20 minutes.
- Make-ahead friendly: The dry-brine happens the night before, so you’re not scrambling on the day itself.
- Scales easily: The technique works whether you’re roasting a 3-bone roast for 6 or a 5-bone roast for 12 — just adjust time by internal temperature, not the clock.
- The drippings become gravy: Those pan drippings are liquid gold. Don’t waste a drop — they make a pan sauce that takes ten minutes and needs almost nothing else.
What You’ll Need
A standing rib roast doesn’t need a long ingredient list — the beef is the star, and the supporting cast exists to amplify it, not compete with it.
For the Roast
- 1 (4-bone) standing rib roast, about 8–9 lbs — Ask your butcher for a “USDA Choice” or “USDA Prime” bone-in rib roast, cut from the chuck end (ribs 6–9) for the most marbling, or the loin end (ribs 10–12) for a slightly leaner roast with a larger eye of meat. Either works beautifully here. Have the butcher “french” the bones if you want a more elegant presentation, and ask them to tie the roast back onto the bones after removing the chine bone — this makes carving much easier.
- 3 tablespoons kosher salt — Diamond Crystal is preferred. If using Morton’s, use 2 tablespoons. Table salt will over-season.
- 2 tablespoons fresh rosemary, finely chopped — Fresh is non-negotiable here. Dried rosemary turns dusty and bitter at high heat.
- 2 tablespoons fresh thyme leaves — Strip them straight from the stem; dried works in a pinch but use half the amount.
- 1 tablespoon coarsely cracked black pepper — Coarse, not fine-ground. The texture matters for the crust.
- 6 cloves garlic, minced to a paste — Smash with the flat of your knife, then mince and smear into a paste with a pinch of salt. This helps it adhere to the surface of the roast.
- 3 tablespoons extra-virgin olive oil — This binds the herb paste and helps the crust develop color.
- 1 tablespoon Dijon mustard — Optional but recommended. It acts as a binder, adds a faint tang, and helps the crust grip the meat.
For the Pan Sauce
- 2 shallots, finely minced
- 1 cup dry red wine — A Cabernet Sauvignon or Côtes du Rhône you’d actually drink works well. Avoid anything labeled “cooking wine.”
- 2 cups good-quality beef stock — Homemade or a low-sodium store-bought carton, not canned broth.
- 1 tablespoon unsalted butter
- Fresh thyme sprig, for simmering
How to Make Herb-Crusted Standing Rib Roast
Day Before: Dry-Brine the Roast
- Mix the herb paste. In a small bowl, combine the kosher salt, rosemary, thyme, cracked pepper, garlic paste, olive oil, and Dijon mustard. Stir until it forms a thick, fragrant paste.
- Apply the paste. Pat the roast thoroughly dry with paper towels — surface moisture is the enemy of a proper crust. Set the roast bone-side down on a wire rack set inside a rimmed baking sheet. Rub the herb paste all over the top and sides of the roast, pressing firmly so it adheres. Don’t worry about the underside where the bones sit.
- Refrigerate uncovered. Place the baking sheet with the roast in the refrigerator, uncovered, for at least 12 hours and up to 36 hours. Leaving it uncovered is intentional — the refrigerator air acts as a gentle dehydrator, drying out the surface so the crust can properly crisp in the oven rather than steam. You’ll notice the surface looks almost tacky by morning. That’s exactly right.
Day Of: Roasting
- Take the chill off. Remove the roast from the refrigerator 2 hours before roasting. Setting cold meat directly into a hot oven extends cooking time unevenly and can lead to an overcooked exterior before the center comes up to temperature. You want the roast at something closer to room temperature before it goes in.
- Preheat the oven to 500°F (or as high as your oven will go). Make sure you have a rack positioned in the lower third of the oven. Bone-side down is the correct orientation — the bones form a natural roasting rack and conduct heat into the meat from underneath.
- Initial high-heat roast. Slide the roast into the oven on its wire rack and baking sheet. Roast at 500°F for exactly 20 minutes. This initial blast sets the crust and jump-starts the Maillard reaction — the browning process that creates all those deep, complex flavors. Don’t skip this step or shorten it.
- Drop the temperature without opening the oven. After 20 minutes, reduce the oven temperature to 250°F. Do not open the oven door. Leave the roast to cook low and slow for approximately 2½ to 3½ hours, depending on the size of your roast and your target doneness. The oven needs time to drop from 500°F to 250°F — that gradual descent is part of the process.
- Monitor with a probe thermometer. This is non-negotiable. A good instant-read or leave-in probe thermometer is the only reliable way to nail a roast like this. Insert it into the thickest part of the eye of meat, away from bone and fat. Pull the roast when the internal temperature reads:
— 120°F for rare
— 125°F for medium-rare (the sweet spot for prime rib)
— 130°F for medium
The temperature will continue to rise 5–8°F during the rest period, so pull it a little early. - Rest — and don’t rush it. Transfer the roast to a cutting board (preferably one with a well for catching juices) and tent it loosely with foil. Rest for a minimum of 30 minutes; 45 minutes is better. Resting allows the muscle fibers, which have contracted and pushed moisture toward the center during cooking, to relax and redistribute juices evenly throughout the meat. Cut too soon and those juices flood your board instead of staying in the roast.
Make the Pan Sauce
- While the roast rests, set the baking sheet directly over two burners on medium heat (or pour the drippings into a skillet). You should have a generous pool of golden, herb-flecked drippings.
- Add the minced shallots and cook, stirring, for 2 minutes until softened.
- Pour in the red wine and let it bubble vigorously, scraping up any browned bits from the bottom of the pan — those are flavor. Reduce by half, about 3–4 minutes.
- Add the beef stock and thyme sprig. Simmer until the sauce is reduced by about one-third and has a slightly syrupy consistency, 6–8 minutes.
- Remove from heat. Swirl in the butter until melted and glossy. Season with salt and pepper to taste. Strain into a warmed serving vessel if you prefer a smooth sauce.
Carve and Serve
- If the butcher tied the bones back on, snip the kitchen twine and set the bones aside. They’re a cook’s snack — there’s excellent meat clinging to them.
- Stand the roast upright, bones pointing away from you. Using a long, sharp slicing knife, cut down along the bones to separate the meat from the bones in one piece. Then slice the eye of meat against the grain into slices about ¾ to 1 inch thick for a juicy, tender result.
- Plate and spoon the pan sauce over the top. Serve immediately.
Tips, Variations & Make-Ahead Notes
Make-Ahead Strategy
The dry-brine is the best make-ahead step — it’s actually better when done 24–36 hours ahead. On the day of serving, the roast needs to come to temperature and rest, so plan your timeline backward from when you want to eat. A 9-pound roast at 250°F will take roughly 3 to 3½ hours after the initial 20-minute blast. Add 45 minutes of resting and 2 hours out of the refrigerator, and you’re looking at starting the process about 6½ to 7 hours before dinner.
Serving Suggestions
A standing rib roast deserves equally classic sides. Pair it with creamy garlic mashed potatoes for the full steakhouse experience, or lean into the holiday spread with sausage apple stuffing alongside roasted root vegetables. Creamy horseradish sauce (prepared horseradish, sour cream, lemon juice, a pinch of salt) is the traditional condiment — mix it up the morning of and let it mellow in the fridge.
Choosing Your Roast Size
Plan on roughly one bone per two people, or about 1 pound of bone-in roast per person. A 3-bone roast (about 6–7 lbs) feeds 5–6; a 4-bone (8–9 lbs) feeds 8–10; a 5-bone (10–11 lbs) comfortably serves 12. Always buy a bone-in roast — the bones insulate and slow the cooking, giving you more control, and they add flavor the boneless version simply can’t replicate.
No Wine? No Problem
If you’d prefer to skip wine in the pan sauce, substitute an equal amount of additional beef stock with a splash of Worcestershire sauce and a teaspoon of red wine vinegar for acidity. It won’t have quite the same depth, but it’s still an excellent sauce.
Storing & Reheating Leftovers
Leftover prime rib is genuinely one of the great things in life. Store sliced meat in an airtight container with a spoonful of the pan sauce or a splash of beef stock to keep it moist. It’ll keep in the refrigerator for up to 4 days. To reheat without overcooking, place slices in a baking dish with a bit of stock, cover tightly with foil, and warm in a 250°F oven for 15–20 minutes. You can also use leftovers for leftover turkey pot pie — or more accurately, a leftover prime rib hash with roasted potatoes and a fried egg, which is arguably better than the original dinner. Slices also hold up beautifully in a French dip sandwich with the warmed pan sauce as your au jus.
Common Mistakes & Fixes
Mistake: Grey ring around the outside of the meat
Why it happens: The oven temperature is too high for too long, overcooking the outer layer of meat before the center reaches the target temperature.
Fix: Use the two-temperature method described here. The 20-minute high-heat blast is purely for crust development; the long, low 250°F roast brings the interior up gently and evenly. This is the single biggest reason home prime rib disappoints — the oven stays too hot for the duration.
Mistake: The crust falls off when slicing
Why it happens: The surface wasn’t dried properly before applying the herb paste, so the paste never bonded well with the meat.
Fix: Pat the surface thoroughly dry with paper towels before applying any seasoning. The overnight uncovered refrigerator rest also does critical work here — it removes surface moisture so the paste essentially fuses to the meat.
Mistake: The roast is done too early (or too late)
Why it happens: Cooking to time instead of temperature. Oven accuracy varies, roast shape varies, and starting temperature varies. The clock is a rough guide at best.
Fix: Always, always cook to internal temperature. A leave-in probe thermometer with an external display — so you don’t have to open the oven — is the most useful tool you can own for a roast like this. Set an alert for 5°F below your target so you can begin monitoring more frequently toward the end.
Mistake: Salty, over-seasoned meat
Why it happens: Using table salt or Morton’s kosher salt at the same volume as Diamond Crystal, which is significantly coarser and less dense. A tablespoon of table salt has nearly twice the sodium of a tablespoon of Diamond Crystal.
Fix: Always measure kosher salt by the brand. If using Morton’s, cut the quantity by about a third. If using fine sea salt or table salt, cut it roughly in half. When in doubt, season more conservatively — you can always add salt at the table, but you can’t take it out.
Frequently Asked Questions About Herb-Crusted Standing Rib Roast
What’s the difference between prime rib and a standing rib roast?
They’re the same cut — a bone-in beef rib roast from the primal rib section. “Prime rib” is the common restaurant term, while “standing rib roast” refers to how it’s cooked: standing upright on the bones like a rack. “Prime” also refers to the USDA grade, though you’ll find delicious rib roasts graded “Choice” at most grocery stores and warehouse clubs. Ask your butcher either name — they’ll know exactly what you mean.

How far in advance can I dry-brine the roast?
You can dry-brine a standing rib roast up to 36 hours ahead, and the results are noticeably better than a same-day seasoning. The salt has more time to penetrate deep into the muscle and the surface dries out thoroughly, setting up the best possible crust. Don’t go beyond 48 hours or the surface can become unpleasantly dry and leathery before it even hits the oven.
What internal temperature should I pull the roast for medium-rare?
Pull the roast when your probe thermometer reads 125°F for medium-rare. With a proper rest period of at least 30–45 minutes, carryover cooking will bring it up to around 130–132°F — right in the center of the medium-rare range. If your guests prefer medium, pull at 130°F. Keep in mind that the temperature near the bones will always be slightly lower than the center of the eye, so use the thickest part of the eye of meat for your reading.
Can I make this in a smaller oven or apartment-sized oven?
Yes, with one adjustment. Smaller ovens can run hotter and have less airflow, which can cause the crust to over-brown before the interior is done. If you’re working with a smaller oven, keep an eye on the crust during the initial 20-minute high-heat blast — if it’s browning very aggressively, drop the temperature a few minutes early. Using a probe thermometer is even more important in this situation, since oven calibration in smaller models tends to be less consistent. If you need a suggestion for sides that work well in the same oven, consider honey thyme roasted carrots, which can roast at a lower temperature alongside or after the main event.
How do I reheat leftover standing rib roast without drying it out?
The key is low heat and added moisture. Place your slices in a baking dish, add a few spoonfuls of beef stock or leftover pan sauce, cover tightly with foil, and warm in a 250°F oven for 15–20 minutes. Avoid the microwave for anything more than a quick 30-second burst at 50% power — it creates uneven hot spots that cause the exterior to overcook while the center is still cold. The oven method keeps the meat tender and re-heats it gently enough to stay rosy rather than turning grey.
Ready to Make Your Holiday Roast?
A Herb-Crusted Standing Rib Roast isn’t a weeknight dinner — it’s the kind of roast you bring out when the table is full, the candles are lit, and the occasion demands something genuinely special. But it’s far less technical than it looks, and the two-temperature method makes it approachable even if this is your first time tackling a large roast. Trust your thermometer, give the roast the rest time it needs, and you’ll carve into something extraordinary.
Once you’ve tried it, come back and let us know how it went — and if you saved any leftovers for the next day’s French dip sandwiches, even better. Pin this recipe now so it’s ready when the holidays roll around, and explore more celebration-worthy mains like maple mustard roast chicken for a smaller gathering any time of year.
Note: photos on this site are AI-generated illustrations of the finished dish. Recipes are developed from established cooking techniques; adjust seasoning and doneness to taste.


